Connecting SOLANA
Physical Connections to the SOLANA
The data connection to the SOLANA is via the RJ45 connector located on the back side of the SOLANA. Use a standard Ethernet cable to connect the SOLANA to your LAN.
SOLANA powers up the network card and joins the network when the instrument powers up.
How to setup and test the SOLANA connection
Setting up the SOLANA for connectivity is fairly easy. The steps are:
-
Confirm that the network cable is attached to SOLANA and connected to the LAN
-
Log in to the SOLANA as an Administrator
-
Configure the Network Settings:
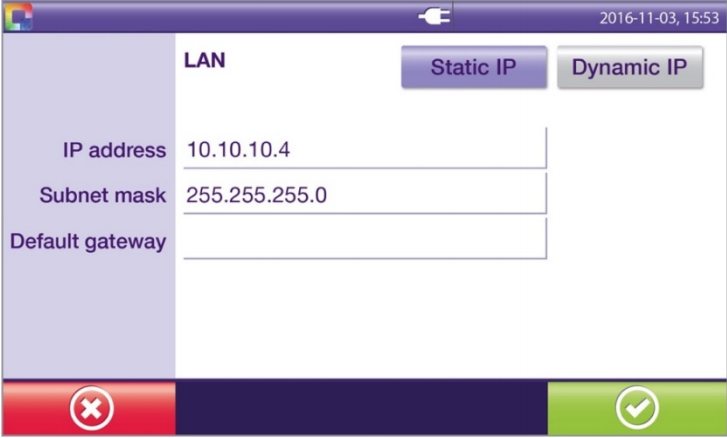
Navigate from the Home Menu -> System -> Settings -> Device settings -> Network configuration -> LAN
Based upon the recommendation of the Network Administrator:
-
Select Static IP or Dynamic IP. If Dynamic IP is chosen, then no other items on this screen need to be completed.
-
If the setting above is Static IP, then enter the IP address, Subnet mask, and Default gateway values.
-
Select the check mark for the values to be saved and the menu to return to the Network Settings menu.
Below is a sample screen showing the default values when the instrument shipped.
If the SOLANA is currently connected to VIRENA, then these settings will need to coordinate with the Network Administrator and possibly QuidelOrtho Technical Support.
-
-
Configure the LIS Server Configuration:
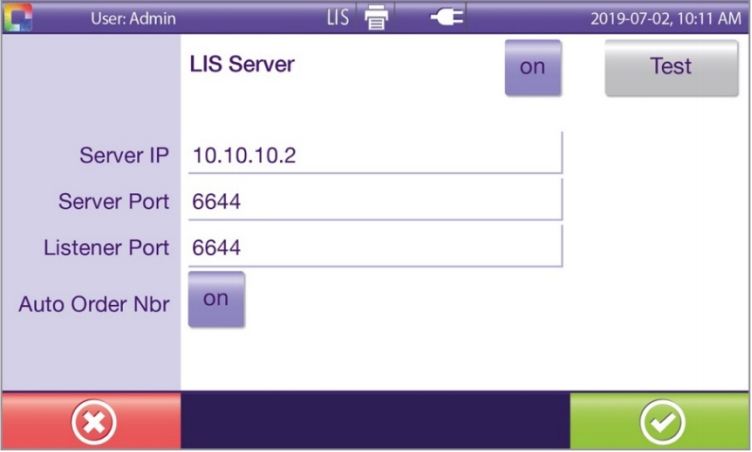
Select LIS Server from the Network Settings menu
Select On for the LIS Server
Based upon the recommendation of the LIS Coordinator or LIS Vendor:
-
Set the Server IP to the IP address of the external System.
-
Set the Server Port that the external System is listening for SOLANA to initiate a connection.
-
Set the Listener Port that the SOLANA will listen for connections from the LIS to receive Orders.
-
Set the value for the Auto Order Nbr to On if the SOLANA needs to generate unique order numbers for each tube in the workflow.
-
Select the check mark for the values to be saved and the menu to return to the Network Settings menu.
Below is a sample screen showing an example setup configuration.
-
-
Test the LIS connection
-
Select LIS Server from the Network Settings menu
-
Select Test - After making this selection, the SOLANA will attempt to make a connection to the LIS at the Server IP and Server Port entered above.
-
If the test is successful, SOLANA will provide the message “Connection tested successfully.”
-
If the test is unsuccessful, SOLANA will provide the message “Connection was not possible.”
In this situation, the SOLANA connection to the LIS needs to be investigated by the LIS Coordinator or LIS Vendor with the person setting up the SOLANA and the assistance of the Network Administrator.
Ping Test
Disconnect the ethernet cable from the RJ45 data port. This action takes the SOLANA off the network. Attempt to Ping the SOLANA’s IP Address in the LAN screen from another computer on the network. If the Ping is successful, the SOLANA’s IP Address is being shared with another device on the network and a new IP Address will need to be acquired. For this test, the Ping request should return ‘Request timed Out’ if the correct IP Address is assigned to the SOLANA.
Reconnect the ethernet cable to the RJ45 data port. This action places the SOLANA on the network. Attempt to Ping the SOLANA’s IP Address in the LAN screen from another computer on the network. If the Ping is successful, the SOLANA has passed the Ping Test.
Network Routing Test
With the Ping Test successful, attempt the Test LIS Connection again.
- If the test is unsuccessful, then the SOLANA’s network routing to the LIS is possibly blocked due to a firewall on the network or some rules on the network are preventing access. At this time, the Network Administrator must troubleshoot the routing of SOLANA to the LIS.
-
-