Connecting the SAVANNA Instrument
Physical Connections to the SAVANNA Instrument
The communications connection to the SAVANNA Instrument is via Ethernet and a standard RJ45 cable connector. Use a standard Ethernet patch cable to connect the SAVANNA Instrument to your LAN.
Wi-Fi Connections to the SAVANNA Instrument
The SAVANNA instrument supports Wi-Fi connectivity using the 802.11 ac/a/b/g/n bands at 2.4GHz or 5 GHz. The supported authentication and encryption protocol is WPA-2 with Pre-shared Key.
How to setup and test the SAVANNA connection
Setting up the SAVANNA Instrument for connectivity is easy. The steps are:
-
Confirm that the network cable is attached to SAVANNA Instrument and connected to the LAN.
-
Log in to the SAVANNA Instrument as an Administrator
-
Configure the Network Settings:
Navigate from the Home Menu -> Setup -> Network Settings. Below screen shall come up.
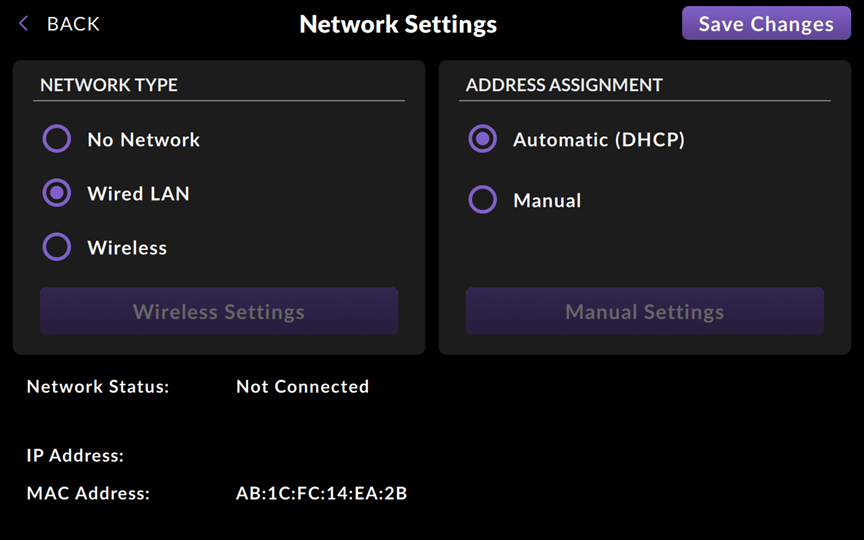
Based upon the recommendation of the Network Administrator:
-
Select Manual or Automatic (DHCP). If DHCP is chosen, then no other items on this screen need to be completed.
-
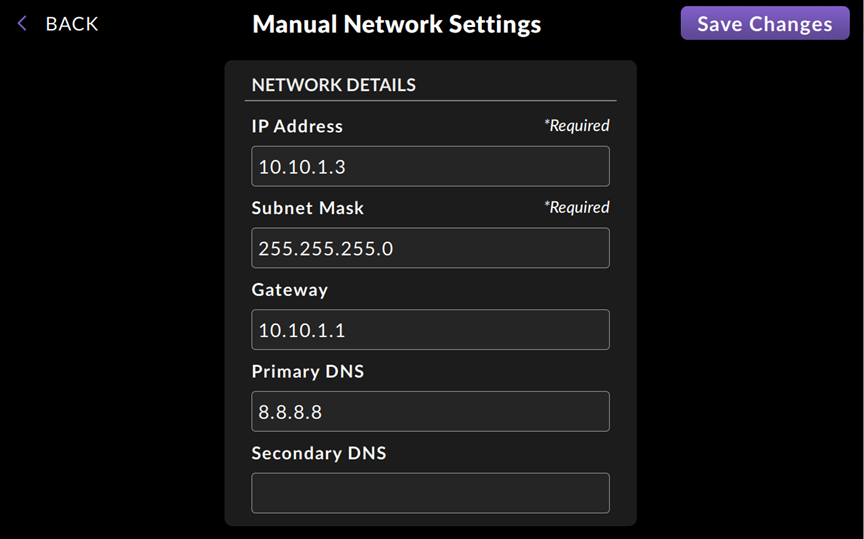
If user is going to input a fixed and reserved IP address under Manual Settings, then on the following screen enter the IP address, Subnet mask, and Default gateway and DNS values.
Below screen shall come up where user will need enter IP Address, Subnet Mask and Gateway along with DNS server addresses.
-
Click Save Changes once all fields are entered.
-
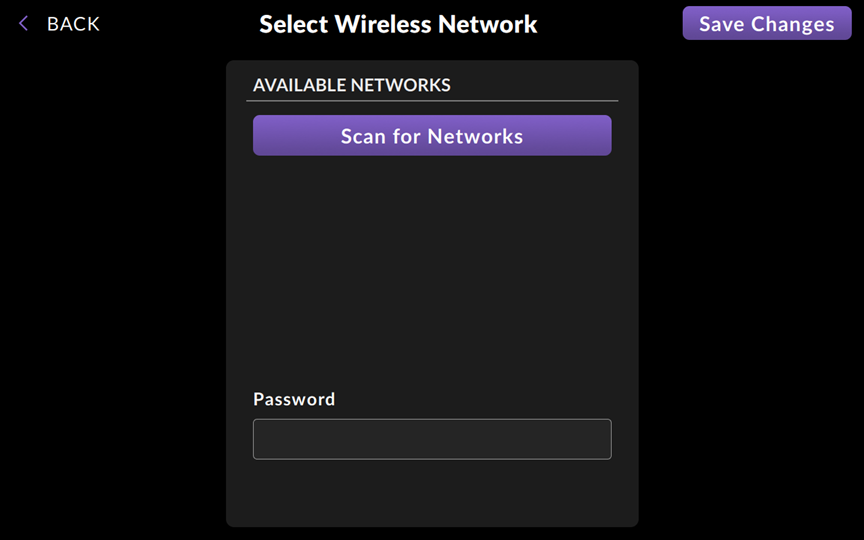
The process to connect with a wireless network is similar except that once wireless network is selected you will have to scan for an available network, pick the correct network and enter network password. This set up is done in the screen pictured below. Note that the SAVANNA Instrument only supports the WPA2 with Pre-shared Key protocol.
-
-
Configure the LIS Server Configuration
To configure the SAVANNA instrument for LIS connectivity, the steps are:
-
Log in to the SAVANNA Instrument as an Administrator
-
Configure the LIS settings as below:
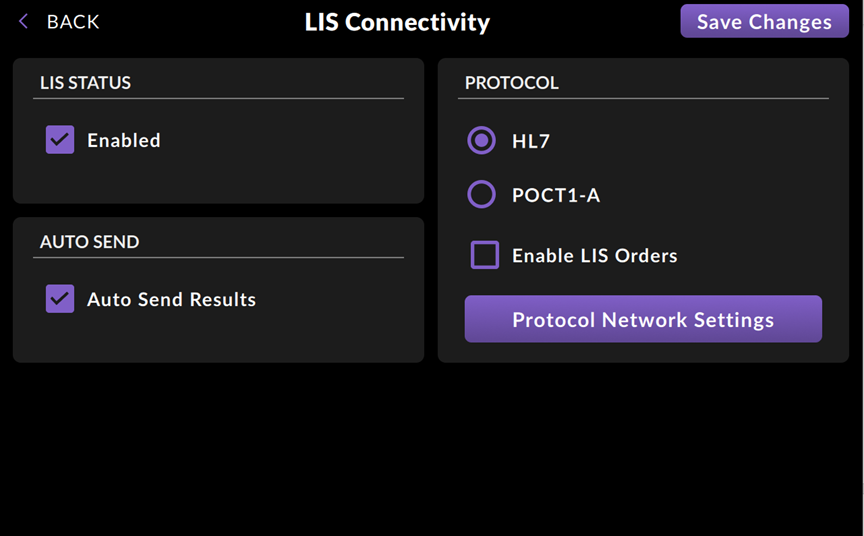
Navigate from the Home Menu -> Setup -> LIS Connectivity.
-
To enable LIS communication, check Enabled under LIS STATUS. Under AUTO SEND, check the box Auto Send Results to have the test results automatically sent to LIS upon test completion. Or leave this unchecked and the user will be given the option to send the test results to the LIS server upon test completion.
-
Select the protocol HL7 or POCT1-A, according to the requirements of the LIS or Point-of-Care system.
-
Select Enable LIS Orders only if your LIS will be configured to send the SAVANNA Instrument test orders. This option is not available if the POCT1-A interface is used.
-
Select Protocol Network Settings to advance to the next screen and fill in all the required details. Note that typically your LIS Administrator or Vendor Support will provide you with the information required.
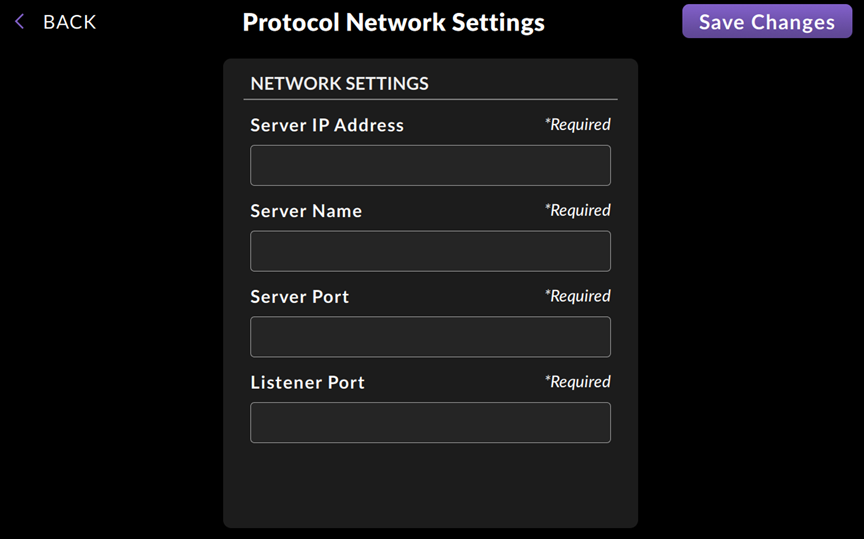
Steps to complete screen above.
-
The Server IP Address is the IP address where SAVANNA Instrument will send the Test Result messages.
-
The Server Name is the network name (DNS name) of the LIS Host. Server name is a required field however the SAVANNA instrument will use Server IP address to make connection to LIS. Server name is a place holder field.
-
The Server Port is the Port on which the LIS Host is Listening for Test Results from the SAVANNA Instrument.
-
The Listener Port is the Port on which the SAVANNA Instrument Listens for Orders from the LIS server. If an Orders Interface is not going to be implemented, this field may remain empty. We advise that you coordinate the listener Port Number that will be used for communication with your Network Support Staff. They may need to adjust network rules to allow connection from LIS to the SAVANNA Instrument. Commonly used ports are 10001 or 10002. If Enable Orders option is left unselected this field is not required and is no longer visible for user input.
-
When all Protocol Network Settings are set as desired, select Save Changes.
This completes the set up for LIS interface configuration.
-
-
-