Connecting SOFIA
Physical Connections to the SOFIA
The data connection to the SOFIA is via the RJ45 connector located on the back side of the SOFIA. Use a standard Ethernet cable to connect the SOFIA to your LAN.
SOFIA powers up the network card only when testing the connection or sending results.
How to setup and test the SOFIA connection
Setting up the SOFIA for connectivity is fairly easy. The steps are:
-
Confirm that the network cable is attached to SOFIA and connected to the LAN
-
Log in to the SOFIA as Supervisor
-
Configure the Network Settings:
Firmware v2.0 and higher - Navigate to the Supervisor Menu -> Settings -> Network Settings -> Set Network Configuration
Firmware v1.3.1 and lower - Navigate to the Supervisor Menu -> Settings -> General Settings -> Network Settings -> Set Network Configuration
Based upon the recommendation of the Network Administrator:
-
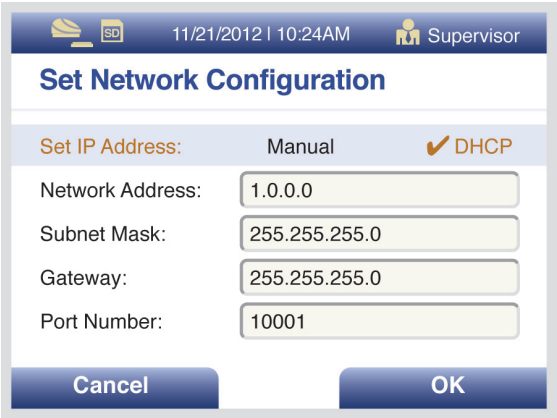
Set the Set IP Address setting to Manual or DHCP.
-
If the setting above is Manual, then enter the IP Address, Subnet Mask, and Gateway values.
-
Leave the Port value at 10001. This setting is internally dependent in SOFIA and should not be adjusted. This setting does not apply to LIS connectivity.
-
Select OK for the values to be saved and the menu to return to the Network Settings menu. Below is a sample screen showing the default values when the instrument shipped.
If the SOFIA is currently connected to VIRENA, then these settings will need to coordinate with the Network Administrator and possibly QuidelOrtho Technical Support.
-
-
Configure the LIS Parameters:
Select Set LIS Parameters from the Network Settings menu
Based upon the recommendation of the LIS Coordinator or LIS Vendor:
-
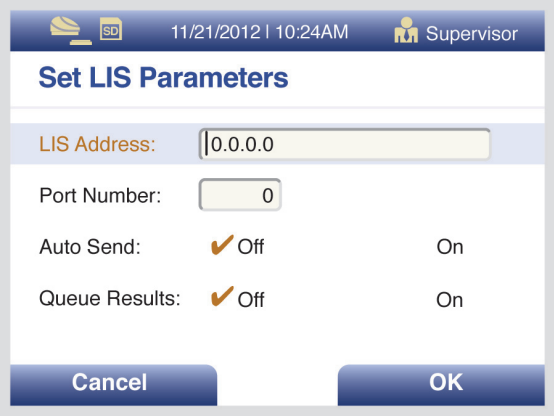
Set the LIS Address to the IP address of the external System.
-
Set the Port Number that the external System is listening for SOFIA to initiate a connection.
-
Set Auto Send to On for results to automatically transmit to the external System after each test completes.
-
Set Queue Results to On to allow results to be tagged for sending to the LIS.
-
For Firmware v2.3 and higher, set the Standard to ASTM to only send results or POCT1A to send results and receive clock and user updates.
-
Select OK for the values to be saved and the menu to return to the Network Settings menu.
Below is a sample screen showing an example setup configuration.
-
-
Test the LIS connection
-
Select the Back button several times to get to the Main Menu
-
Select Review Data
-
Select Send Results
-
Select Send Results to LIS
-
Select Test LIS Connection - After making this selection, the SOFIA will attempt to make a connection to the LIS at the LIS Address and Port Number entered above.
-
If the test is successful, SOFIA will provide the message “The Analyzer can be connected to LIS.”
-
If the test is unsuccessful, SOFIA will provide the message “The Analyzer cannot be connected to LIS.” In this situation, the SOFIA connection to LIS needs to be investigated by the LIS Coordinator or LIS Vendor with the person setting up the SOFIA and the assistance of the Network Administrator.
Ping Test
Enter the code 5260. SOFIA will confirm receipt of this code with an audible beep and the link lights will be off. This code forces the network card to power off. Attempt to Ping the SOFIA’s IP Address in the Network Settings screen from another computer on the network. If the Ping is successful, the SOFIA’s IP Address is being shared with another device on the network and a new IP Address will need to be acquired. The Ping request should return ‘Request timed Out’ if the correct IP Address is assigned to the SOFIA.
Enter the code 5261. SOFIA will confirm receipt of this code with an audible beep and the link lights will come on. This code forces the network card to power up until SOFIA attempts to perform another network test connection or send results. Attempt to Ping the SOFIA’s IP Address in the Network Settings screen from another computer on the network. If the Ping is successful, the SOFIA has passed the Ping Test.
Network Timing Test
With the Ping Test passed attempt the Test LIS Connection again:
-
If the test is unsuccessful, check the link lights by the data connection. If the lights are off, then enter the ‘5261’ code, confirm the link lights are on and Test LIS Connection again.
-
If the test is successful, then the SOFIA is having a timeout issue connecting to the LIS. To correct this issue, QuidelOrtho recommends acquiring an unmanaged switch, specifically the Netgear FS105, to provide an port to SOFIA that is always up.
- If the test is still unsuccessful, then the SOFIA’s network routing to the LIS is possibly blocked due to a firewall on the network or some rules on the network are preventing access. At this time, the Network Administrator must troubleshoot the routing of SOFIA to the LIS.
-
-
-